Download Free Auto dialer & Predictive dialer Software
October 31, 2023 ICT Innovations pleased to announce absolutely life time free license of ICTBroadcast Enterprise Edition upto 50 concurrent channels / calls.Please register your free ICTBroadcast license asap
ICTBroadcast Installation Instructions
System Requirements
Please make sure that you have the needed resources to set up ICTBroadcast on your server before you proceed with ICTBroadcast installation. The following are the minimum requirements.
- Dedicated server
- Good internet connection
- Call/Fax/SMS Termination service or originations services
- Static IP to access a server remotely
The following are the minimum hardware specifications for the dedicated server
- Processor Quad Core 3.2 GHz or higher
- RAM 4 GB or higher
- Hard Disk 500 GB or higher
A fresh installation of RockyLinux 8 & RockyLinux 9 on a dedicated server without any additional software or control panel installed
STEP 1: Download Installation script
wget -O /tmp/ictbroadcast-installer.sh https://service. && \
chmod +x /tmp/ictbroadcast-installer.sh
Step 2: Install the Downloaded Script
sudo bash /tmp/ictbroadcast-installer.sh
STEP 1: Download Installation script
wget -O /tmp/ictbroadcast-installer.sh https://service. && \
chmod +x /tmp/ictbroadcast-installer.sh
Step 2: Install the Downloaded Script
sudo bash /tmp/ictbroadcast-installer.sh
Step 1: Visit the below link to Install Docker According to Required OS
https://docs.docker.com/engine/install/
- Restart the docker service
service docker restart
- Pull the repo from dockerhub
docker pull ictinnovations/ictbroadcast
- Create the container out of image
docker run -d --name ictcontainer -p 80:80 -p 443:443 -p 3306:3306 docker.io/ictinnovations/ictbroadcast tail -f /bin/bash
- Checking the running container id and status
docker ps -a
- Enter/Attached into container
docker exec --privileged -it container_id /bin/bash
Step 2: Run following commands after Enter into container Image
- Restart apache
/usr/sbin/httpd -k start
or
service httpd restart
- Restart php-fpm
/usr/sbin/php-fpm
or
Service php-fpm restart
Install the following composer library in /usr folder
composer require stefangabos/zebra_pagination
- Run following commands for properly configuration of mariadb
mysql_install_db --user=mysql --datadir=/var/lib/mysql
- Restart mysql/mariadb service
service mysqld restart
or
/usr/bin/mysqld_safe --datadir='/var/lib/mysql' --user=mysql &
- For checkcing mysql error log
cat /var/lib/mysql/conatiner_id.err
Install Agent Panel
To ensure successful WebRTC communication in ICTBroadcast, the following prerequisites are essential:
Domain Name / Sub-domain Name: You will need a dedicated domain or sub-domain name for your ICTBroadcast WebRTC setup. Example: webrtc.yourdomain.com or yourdomain.com
DNS Configuration: After deciding on a domain or sub-domain, you will need to create an A record in your DNS management platform (like cPanel, Cloudflare, etc.). Point the A record to your ICTBroadcast server’s IP address. Ensure there are no conflicting records, and give it some time to propagate.
SSL Configuration: WebRTC requires secure communication. You can either use a paid SSL certificate or a free one from Let’s Encrypt.
Setup Let’s Encrypt SSL Certificate: Let’s Encrypt provides free SSL certificates for three months only. To install and configure it
Add VirtualHost in /etc/httpd/conf/httpd.conf file
<VirtualHost *:80>
    DocumentRoot "/usr/ictbroadcast/wwwroot"
    ServerName yourdomain.com
</VirtualHost>
Restart Apache service
service httpd restart
Now that Certbot is installed, you can use it to request an SSL certificate for your domain.
certbot --apache
Configure SSL for ICTBroadcast-WebRTC
mkdir /etc/asterisk/keys
cd /etc/letsencrypt/live/yourdomain.com
echo ” > /etc/asterisk/keys/cert.pem && cat cert.pem >> /etc/asterisk/keys/cert.pem && cat chain.pem >> /etc/asterisk/keys/cert.pem
echo ” > /etc/asterisk/keys/privkey.pem && cat privkey.pem >> /etc/asterisk/keys/privkey.pem
systemctl restart asterisk.service
Login as admin into ICTBroadcast and configure the domain name
Goto Administration => System Configuration menu
Click on Web Site
Add your domain name into "Host / Domain name => domain-name.com" (without http/https)
Add domain name into "Website base URL => https://domain-name.com" (with https://)
save it
Step 3: Install and Run the Database Script
After the installation is complete, open your browser and point it to your server and run the installation script.
For Example : http://192.0.0.0.1/install.php
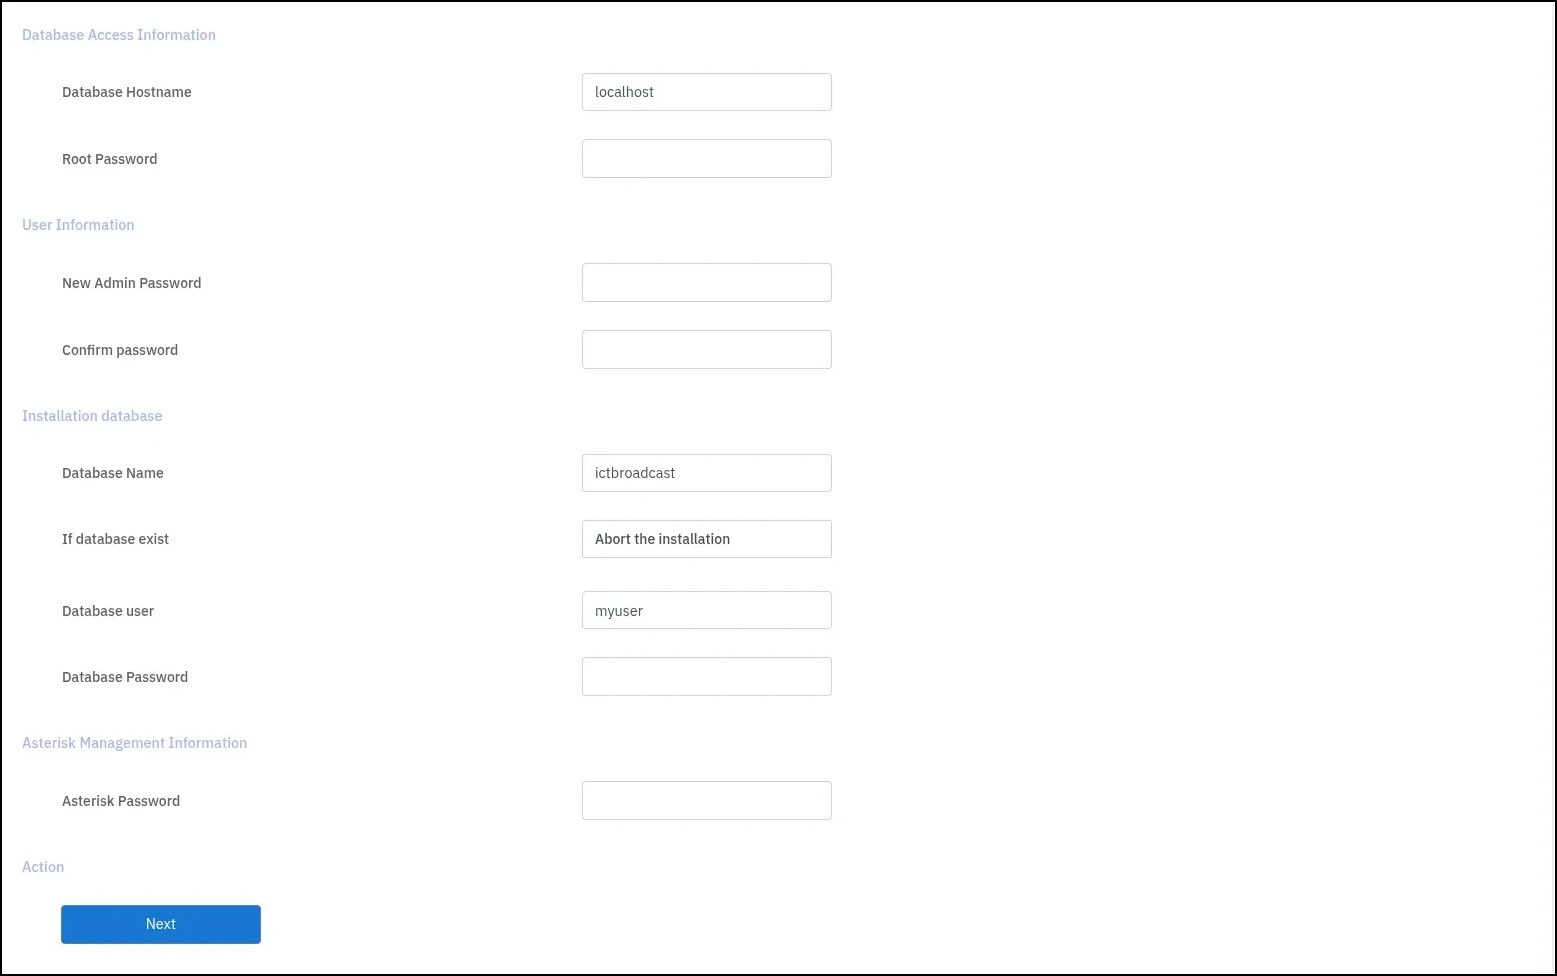
As install.php page opens, you have to enter the follow the below steps for the database installation and configuration :
Database Information:
- The database hostname will be selected as localhost
- Keep the root password blank for localhost
Note:
(If you’ve set a root password for your MySQL database, you can use that password for root during Database installation. If no password is set, just leave the password field empty by default.)
User information:
- Enter/select the admin login password and note it for future use
- Confirm the password again
Installation Database:
- Database name already selected as ictbroadcast
- The database user name will be myuser
- Enter the database password > mypass
Note: if you want to choose different database information, you can use but you have to update the new information in fthe ollowing file
vi /etc/ictbroadcast.conf
vi /etc/odbc.ini
Asterisk Information:
- Enter the asterisk password > mysecret
After putting in the information, click on the submit button, and you will be redirected to the register license key page.
Follow the below Step 4 for the information about how to add/register the license key

Step 4: Registration
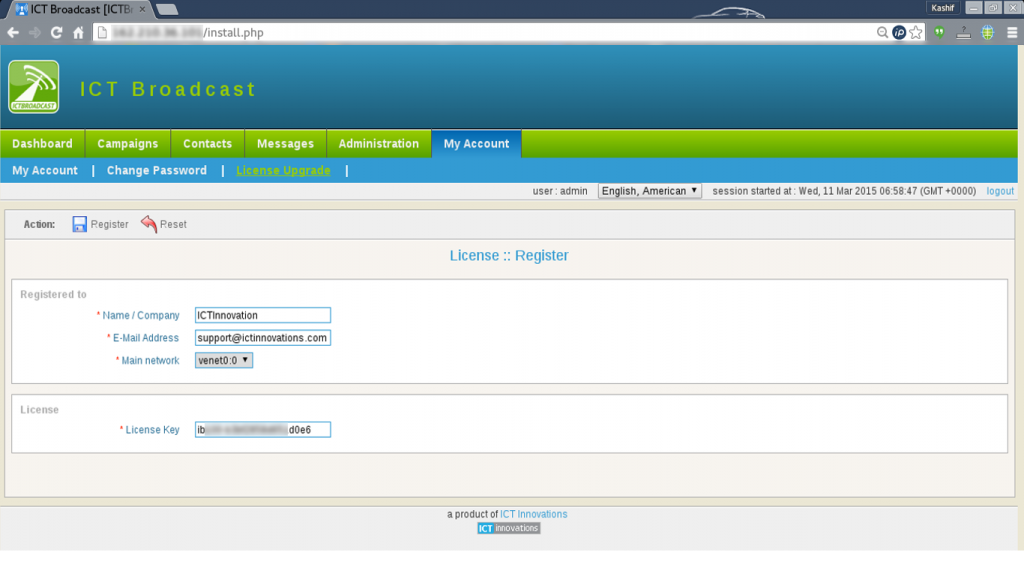
After the database setup browser will be redirected to the registration screen, or you may access the registration page from the My Account -> Update License menu. Here, you have to enter license information. But before you proceed, you may need to get a new license key from our service portal. To get the key, you have to follow the given instructions:

Visit our Service portal and register absolutely lifetime free license of ICTBroadcast Enterprise Edition up to 50 concurrent channels/calls
Finally, log in to the service portal. and then click Services -> My Services and then click on details in front of the corresponding service/product. here you can find your license key. If you face any issue with license activation, please create a support ticket

Related Content
The following page will provide more detail about how to prepare your system http://ictbroadcast.com/content/how-prepare-system-ictbroadcast-ins…